Sunday, October 9, 2011
The Mutter Museum and Book Anatomy
Back in February I was able to take the bus down to Philadelphia and visit the Mutter Museum. Attached to the College of Physicians of Philadelphia, it is in the back of a college buildings, behind two large wooden doors marked with a small sign.
The Mutter Museum primarily displays its collection of anatomical bodies, bones and waxwork replicas, and only has a small selection of books about anatomy on display. The one book I remember most vividly is both a book abut anatomy and a book made from flesh itself, as it was bound in the skin of a consenting patient who dies of the disease the book concerned. Both medically fascinating and emotionally gruesome, the Mutter frames itself as an academic museum, and manages for the most part to avoid death becoming a spectacle rather than an educational dialogue. However, this interest in preserving the quiet, contemplative air of the museum means photographs couldn't be taken! I'm relying on the photographs people have posted online (they must have had a less swift security guard than mine!)
Except for making long pilgrimages to centers for anatomy and medicine, my main access to anatomical details is the same resource used by medieval doctors: large plates of anatomy printed in expensive books! The relation of the book as a portal of information and visual information to the field of dissection if fascinating. I open up a book, and can have the same information someone has gathered by opening up a body. The relation of interior and exterior works in book metaphors too: "She read him like a book", "don't judge a book by its cover". As an avid book reader, the idea of books being very person-like is not a far stretch!
Inspired by my visit to the Mutter Museum, and the collection of anatomical pop-up books in the Thomas Fisher Rare Book Library in Toronto, I created a paper-and-acetate book of a female figure that has several layers of biological 'armor' that is slowly stripped with each turned page. On my way home, made on the bus from paper, acetate, a discarded geographic book and a lots of Japanese paste, my book doesn't have the same presence as a large, finely printed medical book, but it can be checked out of the Toronto Reference Library nonetheless, through their Artist Book Collection! Between the long bus ride and the pressing deadline from the Reference Library, my book was documented using my cellphone camera, but at least you get a peek!
Friday, June 10, 2011
Nanobooks - 'Little Moving Things'

I went to the annual opening of Nanobooks, the end result of a micro publishing class taught by Shannon Gerard at OCADU.
http://littlemovingthings.tumblr.com/
Every year they have beautifully crafted miniature books full of wisdom and mirth. I now have books covering a wide range of topics from how to swear in Polish to a collection of ukelele songs and a book of Toronto neighbourhood histories. They are always thoughtfully created, beautifully made and crack me up!
This year it is open until June 19th, Nanobooks is a perfect place to create a mini book library or get gifts at a great price. Trust me, it's addictive!
Sunday, June 5, 2011
'I Carry My City' and 'I Keep My City' flipbooks
I've been working on a set of flipbooks or 'thumb cinema', illustrating how one's favourite places travel around with you wherever you go. The first two are complete, while the others are still in the sketchbook phase.
After being drawn and inked on my light-table, I print the books on an archival giclée printer and hand-sew them. The cover is an intaglio print from a copper plate of a building made into a hard-cover to keep your treasured city safe.
'I Carry My City'

'I Keep My City'

After being drawn and inked on my light-table, I print the books on an archival giclée printer and hand-sew them. The cover is an intaglio print from a copper plate of a building made into a hard-cover to keep your treasured city safe.
'I Carry My City'

'I Keep My City'

Tuesday, May 17, 2011
Buildings to Crush, Buildings to Build

Once I'd created the blueprint to fold my own set of buildings, I started to create mini-cities. This mini-city has the added benefit of reinforced sides and a pinhole in the bottom to blow it back up after it has been crushed.
DESTROY BUILD DESTROY
And crushed. And crushed. There's a little bit of Godzilla in me.
Saturday, May 7, 2011
TCAF-errific!

I managed to get down and wade through the enormous crowd of people attending this weekend's annual TCAF (Toronto Comic Arts Festival). It's inspiring both to see the people publishing their small pieces of awesome and to see the enormous turnout!
I got to visit with my friend and prof Shannon Gerrard, who in addition to selling her graphic novel and her mini graphic series had her crocheted plushtaches, which are addictive props to own. All Facebook profile pictures benefit from having a plushtache! (Mine is pink striped!) If you miss your chance at TCAF, they're also sold at the Drake General Store...

I also now have Jeph Jacques' 'Questionable Content' anthology of his webcomics origins. A good day for comics all around!
Monday, May 2, 2011
QR Codes are the New Black?
Monday, April 25, 2011
Printing Footprints
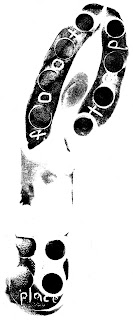
Boots became plates in my latest project.


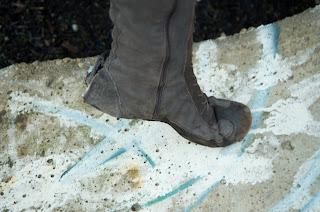
Being an avid walker, I have a tendency to wear my boots down to smooth surfaces. Cutting the soles with lino tools into walking plates means that with every step I am printing my way across the city!


I've been leaving footprints behind, mapping my favourite walking spots.


I photographed my favourites and created a box to hold my old shoes along with a book of their footprints. Paging through the city one step at a time!


Being an avid walker, I have a tendency to wear my boots down to smooth surfaces. Cutting the soles with lino tools into walking plates means that with every step I am printing my way across the city!


I've been leaving footprints behind, mapping my favourite walking spots.


I photographed my favourites and created a box to hold my old shoes along with a book of their footprints. Paging through the city one step at a time!


Sunday, January 16, 2011
Side Project Princess Leia Hat
While I have a pretty good collection of hats, I have always secretly harboured a hat want-list. This stretches from one of those opera hats with the giant horns to a replica of the slouchy red cap sported by the majority of garden gnomes and of course a Princess Leia hat.
A quick Princess Leia side project led to my first stab at millinery (which led to several accidental stabbings of my head with pins, as I fitted the hat directly onto my head).

I started out with the idea of having three large triangles sewn together in a cone. I then folded under the point of the cone until it fit to my head and pinned the ends of the triangles to fit.


While wearing the hat prototype, I drew on where my eyebrows were to create the brow line, and traced around my ears. I also lengthened the back by a good three inches.


Once I cut out the pieces, I sewed them together and realized the front was a bit loose. My muslin had not an ounce of stretch unlike the coat lining fabric I used for the actual hat! I added a seam in the front and put some elastic along four inches of the hem in the back to add a gather.

Finally I cut four inch wide stripes for the cinammon buns, sewed them together, turned them inside out and stuffed them. I sewed the first two buns together and firmly attached them to the hat, resulting in a semi-adorable monkey effect. The additional stuffed strips were sewn onto the bun that was already on the hat so it would stand up from the bun rather than the hat and still be firmly on!

And that was that! Now the people on my bus route are treated to Princess Leia every morning on their daily commute and my ears are mighty warm under those huge buns!


A quick Princess Leia side project led to my first stab at millinery (which led to several accidental stabbings of my head with pins, as I fitted the hat directly onto my head).

I started out with the idea of having three large triangles sewn together in a cone. I then folded under the point of the cone until it fit to my head and pinned the ends of the triangles to fit.


While wearing the hat prototype, I drew on where my eyebrows were to create the brow line, and traced around my ears. I also lengthened the back by a good three inches.


Once I cut out the pieces, I sewed them together and realized the front was a bit loose. My muslin had not an ounce of stretch unlike the coat lining fabric I used for the actual hat! I added a seam in the front and put some elastic along four inches of the hem in the back to add a gather.

Finally I cut four inch wide stripes for the cinammon buns, sewed them together, turned them inside out and stuffed them. I sewed the first two buns together and firmly attached them to the hat, resulting in a semi-adorable monkey effect. The additional stuffed strips were sewn onto the bun that was already on the hat so it would stand up from the bun rather than the hat and still be firmly on!

And that was that! Now the people on my bus route are treated to Princess Leia every morning on their daily commute and my ears are mighty warm under those huge buns!


Friday, January 7, 2011
Colette Wrap Dress Sew-Along

Crepe Sew-Along 2010!
As an avid reader of Gertie's New Blog For Better Sewing, I have longingly followed along with her last sew-along - a beautiful Lady Gray winter coat whose construction was so clearly out of my sewing ability that I simply watched.
However, my time has come! Gertie is holding a beginner sew along on a Colette pattern wrap dress:

Available online at www.colettepatterns.com/shop/crepe , this is a simply wrap dress with the wrap in the back. Always a sucker for a sweetheart neckline, I signed up with my sewing buddy Maddy!
Stayed tuned for the upcoming muslin experiences, in which I will be tacking inches onto the pattern in order to fit all six feet of me - yes, I am six feet tall. Blame all the KD I consumed as a child. I still get a little misty-eyed at the sight of powdered 'cheese'.
Holiday Fudge!
Inspired by the wonderfully delectable photographs of Andrew Lewis' fudge on Craftzine { http://blog.craftzine.com/archive/2010/11/fudge_recipes.html }, I tried my hand at fudge once more.
My first attempt at fudge was as an impatient twelve year old. Having found the recipe as part of an Anne of Green Gables book, my mom and I set out to make the fudge. After what seemed like between four to six hours of stirring drudgery, I gave up on the idea of the fudge ever setting and resorted to eating it with spoons.
This second attempt went much more successfully.

To create this fudge yourself I highly recommend reading through Andrew's methodical steps - it's more than the slapdash methodology you'll get here!
Along with the ingredients below, you'll need a working stove or alternative source of flame, a pot, wooden spoon, a bowl of cold water, spatula, electrical beaters for the brave of heart, a 9x13ish pan lined with parchment or waxed paper for the end result and several fudge sycophants who nod along with you as long as you keep the fudge coming.
Gathering all my ingredients together led to an immediate discovery: if you are shocked to find a sole can of evaporated milk in your pantry, it is probably as old as your place itself. Case in point - mine expired in 2003. Get ye to a grocery store and buy a new can of evaporated milk. While some people may have read the expiration date handily labeled on the top of the can, I prefer the method of opening the can immediately followed by gagging and several exclamations of 'What is that smell?1?'.
Anyways. Moving on. I'm following the basic outline of Andrew's chocolate fudge:
2 cups of sugar
half a can of evaporated milk
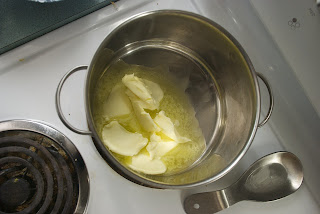
1/4 cup or so of butter (butter never hurts)
2 tbsp. of water
and then the chocolate content.

Of course, what's the point of trying out a new recipe without some immediate tweaking? The major alteration to the original recipe I decided was to add a healthy handful of good chocolate chips to the mix, and reduced the 6 tablespoons of cocoa to 3 tablespoons.

I set myself up on the stove with my bowl of cold water next to the pot for checking the fudge consistency.

Turn the pot on medium heat and begin chucking in all the ingredients in rapid succession. Stirring helps.

Once everything melted together, I turned the timer on for ten minutes and used my wooden spoon to stir continuously - and I do mean continuously as in round and round and round with no stopping while it bubbles away.

Now at this point most intrepid fudge-making bloggers would set up some kind of tripod-mounted stop-motion recording of their fudge cooking away. I instead chose to call my sister and talk for fifteen minutes straight about all kinds of important life-altering events and current politics, including at least one summary of the latest 'How I Met Your Mother' re-run.
Andrew has some lovely photos of his fudge. How he managed the constant stirring and taking of photographs is beyond me - clearly some ambidextrous skills coming out to play.
I beat my fudge with the electric beaters on medium for exactly five minutes, at which point I poured it into the 9x13 pan and cut it into squares.

While some samples survived to be tried by my sewing buddy Maddy, most were immediately demolished as it was both delicious AND able to be consumed with implements beyond fingers.

Fudge accomplishment unlocked!
My first attempt at fudge was as an impatient twelve year old. Having found the recipe as part of an Anne of Green Gables book, my mom and I set out to make the fudge. After what seemed like between four to six hours of stirring drudgery, I gave up on the idea of the fudge ever setting and resorted to eating it with spoons.
This second attempt went much more successfully.

To create this fudge yourself I highly recommend reading through Andrew's methodical steps - it's more than the slapdash methodology you'll get here!
Along with the ingredients below, you'll need a working stove or alternative source of flame, a pot, wooden spoon, a bowl of cold water, spatula, electrical beaters for the brave of heart, a 9x13ish pan lined with parchment or waxed paper for the end result and several fudge sycophants who nod along with you as long as you keep the fudge coming.
Gathering all my ingredients together led to an immediate discovery: if you are shocked to find a sole can of evaporated milk in your pantry, it is probably as old as your place itself. Case in point - mine expired in 2003. Get ye to a grocery store and buy a new can of evaporated milk. While some people may have read the expiration date handily labeled on the top of the can, I prefer the method of opening the can immediately followed by gagging and several exclamations of 'What is that smell?1?'.
Anyways. Moving on. I'm following the basic outline of Andrew's chocolate fudge:
2 cups of sugar
half a can of evaporated milk
1/4 cup or so of butter (butter never hurts)
2 tbsp. of water
and then the chocolate content.

Of course, what's the point of trying out a new recipe without some immediate tweaking? The major alteration to the original recipe I decided was to add a healthy handful of good chocolate chips to the mix, and reduced the 6 tablespoons of cocoa to 3 tablespoons.

I set myself up on the stove with my bowl of cold water next to the pot for checking the fudge consistency.

Turn the pot on medium heat and begin chucking in all the ingredients in rapid succession. Stirring helps.

Once everything melted together, I turned the timer on for ten minutes and used my wooden spoon to stir continuously - and I do mean continuously as in round and round and round with no stopping while it bubbles away.

Now at this point most intrepid fudge-making bloggers would set up some kind of tripod-mounted stop-motion recording of their fudge cooking away. I instead chose to call my sister and talk for fifteen minutes straight about all kinds of important life-altering events and current politics, including at least one summary of the latest 'How I Met Your Mother' re-run.
Andrew has some lovely photos of his fudge. How he managed the constant stirring and taking of photographs is beyond me - clearly some ambidextrous skills coming out to play.
I beat my fudge with the electric beaters on medium for exactly five minutes, at which point I poured it into the 9x13 pan and cut it into squares.

While some samples survived to be tried by my sewing buddy Maddy, most were immediately demolished as it was both delicious AND able to be consumed with implements beyond fingers.

Fudge accomplishment unlocked!
Subscribe to:
Comments (Atom)


